15 Powerful Reasons to Master REST API Today

REST API Introduction
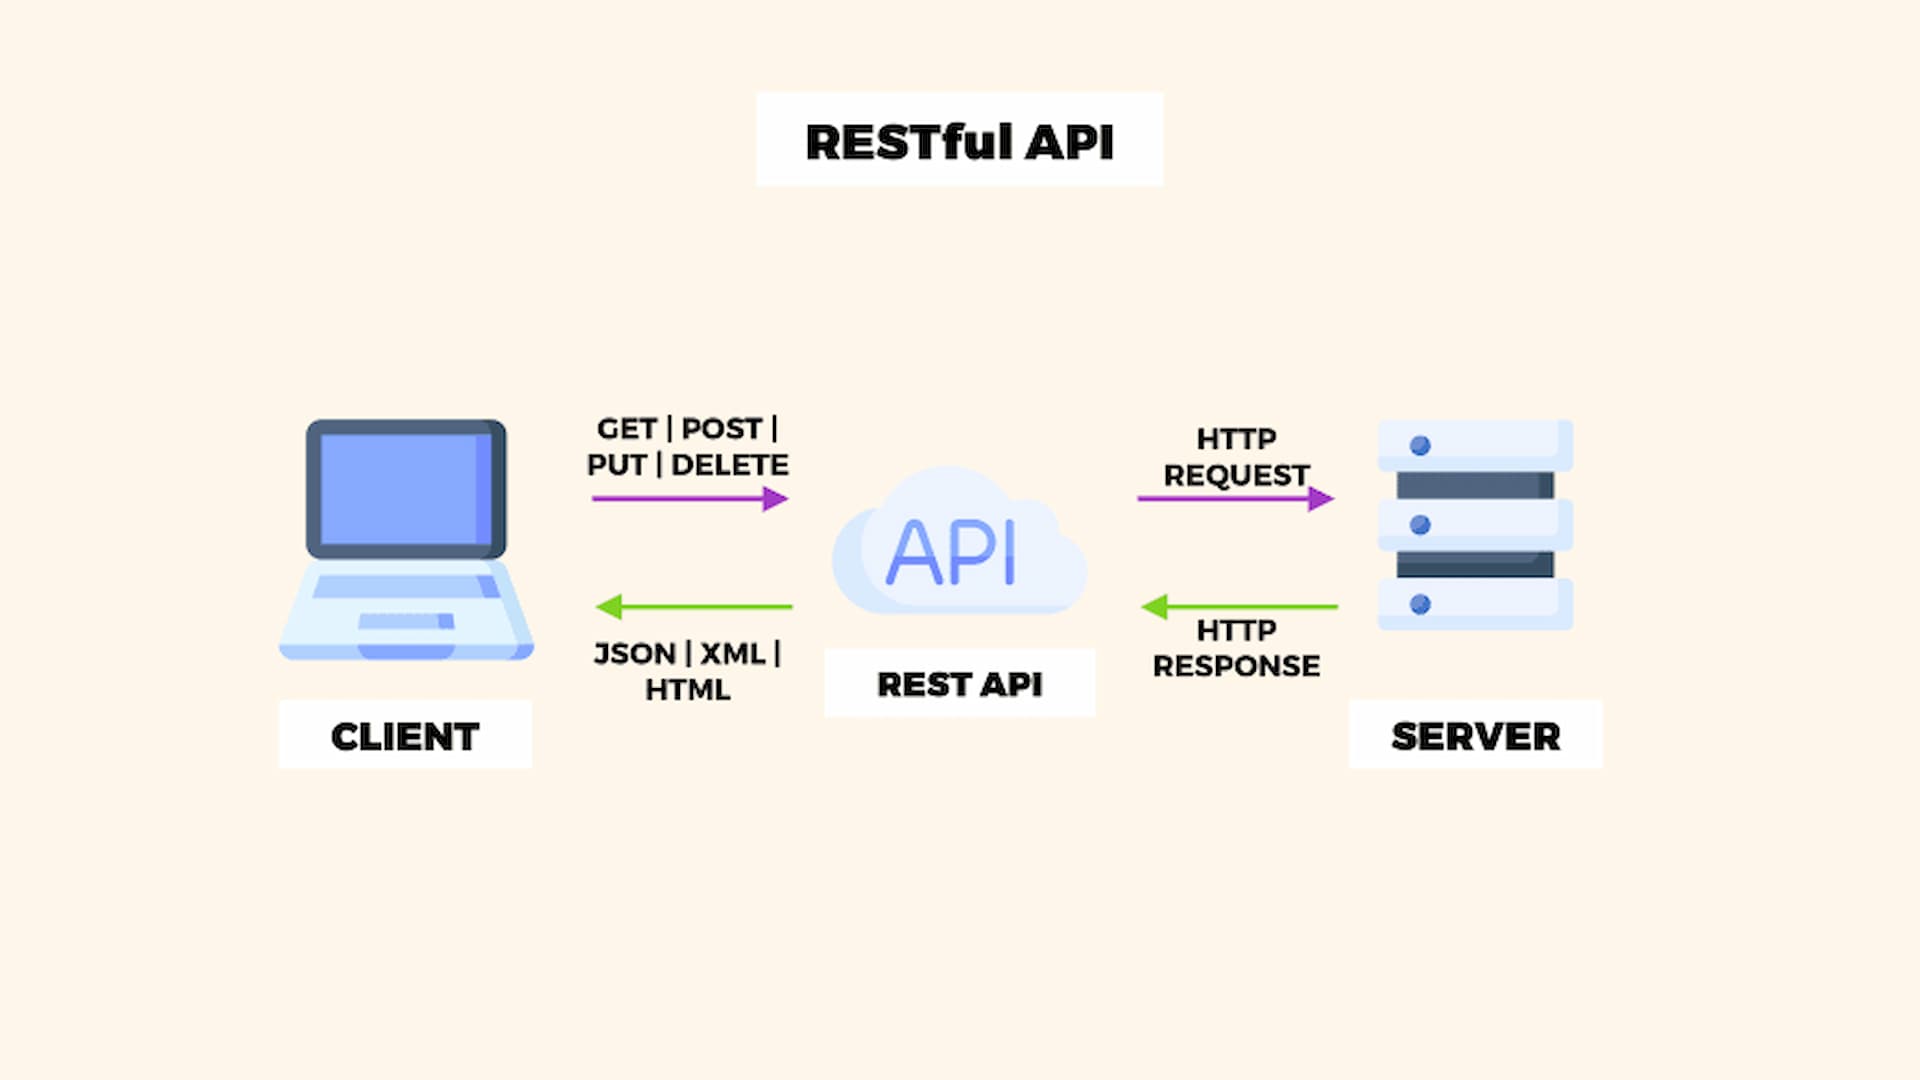
A REST API (Representational State Transfer Application Programming Interface) is a standard that enables various aspects of a web application to talk to each other using standard HTTP requests like GET, POST, PUT, and DELETE. It Acts as a Bridge Between the Frontend and Backend of your app.
- REST API Introduction
- Behind the Scenes of an API: The Pizza Analogy
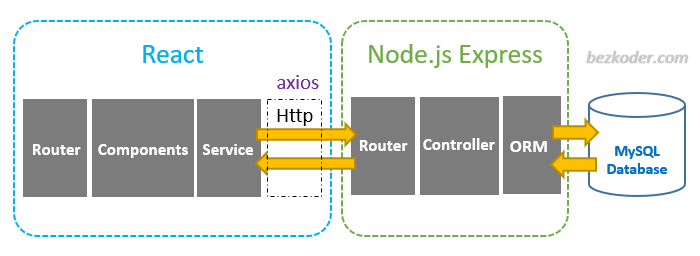
- Using Axios in the Front End
- Using Node.js in the Backend
- Why Use REST API in React?
- Having Express.js in the Backend
- HTTP Methods in REST API
- Step-by-Step Guide: Build It From Scratch
- Test Your API Calls
- Core Principles of REST API
- HTTP Status Codes
- REST API Designing
- Advantages of Utilizing REST API
- Common Challenges and Solutions
- Best Practices for REST API Development
- FAQs
- Conclusion
Behind the Scenes of an API: The Pizza Analogy
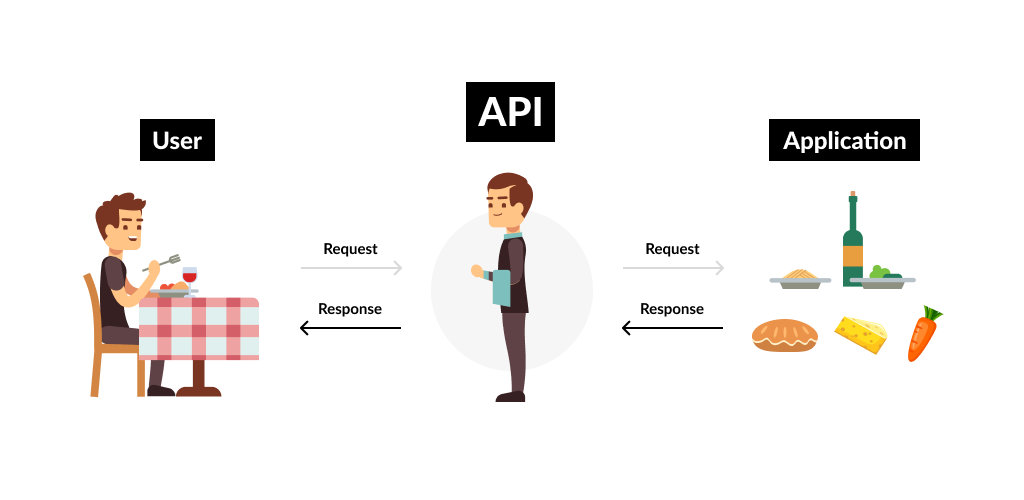
Still confused about how APIs actually work? This part employs a pizza order to illustrate how various components of an app—such as React, Axios, REST API, and Express.js—collaborate to get the job done.
Suppose you’re ordering a pizza from the internet.
React (Frontend):
This is the area of the app where you select your toppings, input your address, and hit the “Order” button.
React takes care of the user interface—what you see, interact with, and input.
Axios (Frontend Request Sender):
The moment you click “Order”, Axios sends that information (your order) to the server.
You can visualize Axios as the waiter in a restaurant—it holds the request from React to the backend and waits for a reply.
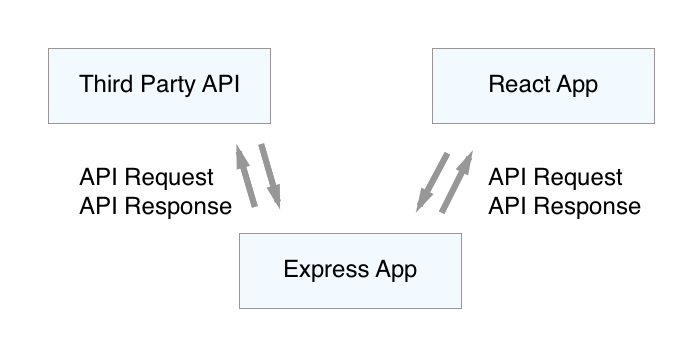
REST API (The Order Window):
The request passes via the REST API, which serves as the order window in the kitchen.
It prescribes how the order is being sent (by means such as GET or POST) and enforces everyone abiding by the same rules of communication.
Express.js (The Chef in the Kitchen):
When the request reaches the kitchen, Express.js steps in to handle it.
It interprets the order, verifies the information, processes it, and creates a response.
Express takes care of all the logic—such as verifying availability or validating the order.
Node.js (The Kitchen Where Cooking Happens):
Node.js is where Express is executed.
It’s like the physical kitchen arrangement—the stove, counter, and utensils the chef (Express) works with to accomplish the work.
Node.js powers the backend operations and keeps everything running smoothly.
Back to React (Frontend Displays Confirmation):
After Express (through Node.js) finishes preparing the response, it passes it back via the REST API, Axios captures it, and React shows a message such as:
“ Your hot, cheesy goodness is 30 minutes away!”
Together, these tools create a whole full-stack system in which:
•React + Axios manage the frontend
•Node.js + Express.js drive the backend
•The REST API ties everything together and speaks the same language
This configuration makes your web app dynamic, fast, and scalable—all while utilizing JavaScript throughout the entire stack.
Using Axios in the Front End
Axios is an HTTP client written in JavaScript that is utilized to handle communication between your front-end application and a server.
• It is widely used in frameworks such as React, Vue, and Angular, making it a front-end developer’s favorite.
• It allows you to refresh content in real-time without the need to reload the whole page.
• Axios takes care of the technical process behind the scenes, making your application remain fast, responsive, and user-friendly.

Using Node.js in the Backend
Node.js is a JavaScript runtime environment that lets developers run JavaScript code outside the browser—on the server side.
• Executes JavaScript on the Server: Node.js allows you to execute JavaScript to create backend systems that execute outside the web browser.
• Asynchronous and Non-blocking: It executes numerous tasks simultaneously without waiting, making it ideal for real-time functionality.
• Optimized for Speed and Scalability: Node.js is fast and can support many users, best suited for popular apps such as chats or live feeds.
Why Use REST API in React?
React is great for creating dynamic UIs, but it doesn’t handle or store data on its own. That’s when a REST API is used—it does all data processing, saving, retrieving, and updating by talking to a server or database.
Having a REST API in React makes your app stronger and modular.
Having Express.js in the Backend
Express.js is a lightweb framework for Node.js that simplifies the development of server-side applications, routing, and data flow. It makes it simpler for your backend to receive requests and respond—particularly when developing APIs.
• Simplifies Server Logic: Express allows you to define explicit routes for varied forms of requests such as GET, POST, PUT, and DELETE.
• Processes Requests and Responses: It receives incoming data and returns results in a neat, formatted format such as JSON.
• Integrates Effortlessly with REST APIs: Express is perfect for creating APIs that integrate your frontend (such as React) with your backend services.
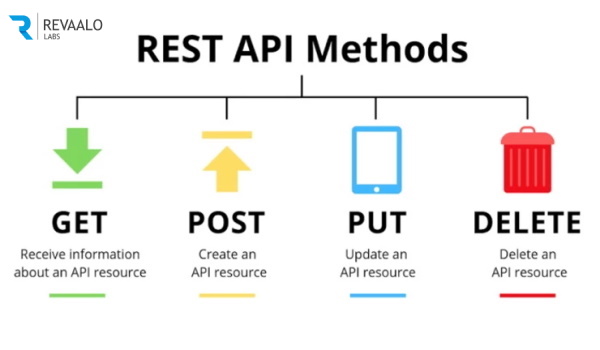
HTTP Methods in REST API
A basic REST API allows your application to do simple things such as:
• GET: Retrieves information from the server. Example: Fetching a User’s Profile Information”
•POST: Sends information to the server to add a new resource, e.g., creating a new user.
PUT: Changes a current resource on the server. For example, changing user information.
•DELETE: Deletes a resource from the server, e.g., deleting a user.
• PATCH: Used for Updating Specific Parts of a Resource”
We will be utilizing Node.js and Express to implement this API.
Step-by-Step Guide: Build It From Scratch

Step 1: Open VS Code
Before doing anything, open Visual Studio Code (VS Code) on your computer. It’s where you’ll write, manage, and organize all the code for both your frontend and backend.
You can either:
- Open a new folder where you want to create your project, or
- Create a folder manually and then select “Open Folder” in VS Code to work inside it.
Once your folder is open, you’re ready to move on to installing Node.js and creating your React app.
Part 1: Installing Node.js and Setting Up the Client (React App)
Step 2: Download and Install Node.js
- Go to https://nodejs.org
- Download the LTS (Long-Term Support) version.
Step 3: Verify Installation
Open your terminal and run:
node -v
npm -v
You should see version numbers if Node.js and npm were installed successfully.
Step 4:Start a New React App from Scratch
In your terminal, navigate to where you want your project folder and run:
npx create-react-app my-app
This creates a folder called my-app with everything you need to start a React project.
Step 5: Move Into the Project Directory
cd my-appPart 2: Setting Up the Server (Express.js + REST API)
Step 5: Create a Server Folder Inside the Project
Set Up a Dedicated ‘server’ Subdirectory Within the my-app Structure
mkdir server
cd server
Step 6: Initialize Node.js in the Server Folder
npm init -yThis will generate a package.json file.
Step 7: Install Express.js
npm install expressStep 8: Create a Basic Server File
Initialize index.js as the Entry Point in the Server Folder. Add this basic Express server code:
const express = require('express');
const app = express();
const PORT = 5000;

// Sample REST API route
app.get('/api/message', (req, res) => {
  res.json({ message: 'Hello from Express!' });
});

app.listen(PORT, () => {
  console.log(`Server is running on http://localhost:${PORT}`);
});
Part 3: Connect Client to Backend Using REST API
Step 9: Install Axios in Your React App
Go back to the root of your React app and type in the terminal:
npm install axios· npm install axios: Adds Axios to your React project so you can make HTTP requests.
· Axios helps your React app send a request to the Express backend and get a response back.
Step 10: Trigger Backend API Calls in React via Axios
Open App.js in your React project and add:
import { useEffect, useState } from 'react';
import axios from 'axios';

function App() {
  const [message, setMessage] = useState('');

  useEffect(() => {
    axios.get('http://localhost:5000/api/message')
      .then(response => {
        setMessage(response.data.message);
      });
  }, []);

  return (
    <div>
      <h1>{message}</h1>
    </div>
  );
}

export default App;
What’s Happening in This Code?
- useState(”): Sets up a state variable message to hold the text that comes from the backend.
- useEffect(): Executes the enclosed code on initial component render..
- axios.get(‘http://localhost:5000/api/message’):
- Sends a GET request to the backend route /api/message hosted on port 5000.
- This route lives in your Express server, where you previously defined:
app.get('/api/message', (req, res) => {
  res.json({ message: 'Hello from Express!' });
});
- .then(response => { setMessage(…) }):
- Once the backend sends the response, it grabs the message field and updates the message state.
- <h1>{message}</h1>:
- Displays the message on the screen.
Step 11:Running the App
Run the Backend (Express Server)
- In one terminal tab, go to the
serverfolder and run:
node index.js
You should see:
Server is running on http://localhost:5000Run the Frontend (React App)
In a new terminal tab, go to the my-app folder and run:
npm startThis will launch the React app in your browser at:
http://localhost:3000
What Output Will You See in the Browser?
Once both servers are running properly, your React app will display:
Hello from Express!That message came from your Express backend, passed through the REST API, delivered by Axios, and displayed by React.
Test Your API Calls
Validate API Endpoints Using Tools Like:
- Postman
- Insomnia
- Swagger UI (if available)
You can also test your app using Jest and React Testing Library.
Practical Styling Using React Bootstrap in 2025
Once Your REST API is Connected, Focus on Improving the UI. Check out this complete guide on React Bootstrap in 2025 to style your frontend beautifully.
This tutorial demonstrates how to blend layout and design with API-based

Core Principles of REST API
To understand the nature of REST API, let’s look at its core principles:
•Statelessness: Every client request to the server needs to include all the information required. Each request is independent, allowing the server to scale easily and stay maintainable.
•Client-Server Architecture: The server and client are independent of each other, enabling modular development and maintenance.
•Uniform Interface: REST APIs have a uniform means of communication, making interactions easy and ensuring consistency.
•Cacheability: Responses may be categorized as explicitly cacheable or non-cacheable, improving performance through minimized server load that is unnecessary.
•Layered System: Multiple layers may constitute a REST API, with each layer performing particular tasks, which improves scalability and management.
HTTP Status Codes
HTTP status codes give feedback concerning the outcome of a request:
•200 OK: The request was successful.
•201 Created: Confirms Successful Creation of a New Resource.
•400 Bad Request: Indicates an Invalid or Malformed Request
•401 Unauthorized: Authorization is needed.
•404 Not Found: The requested resource is not present.
•500 Internal Server Error: An error was encountered by the server.
REST API Designing
Effective REST API designing requires proper planning and best practice compliance. Below are the core elements worth focusing on:
•Resource Identification: Resources must be identified with URIs (Uniform Resource Identifiers). For instance, users to indicate a collection of users.
•Nouns in URIs: URIs must utilize nouns to denote resources, not actions. HTTP actions determine the behavior.
•Hierarchical Structure: Define URIs as hierarchical to map relationships. use /users/123/posts to retrieve posts from a specific user.
•Stateless Operations: Keep every request self-contained to preserve the stateless property of REST.
•Consistent Naming Conventions: Make consistent and logical names for the resources to maintain clarity and ease of use.
Following these standards, developers are able to make REST APIs simple and easy to use.
Advantages of Utilizing REST API
Using REST API has several benefits:
•Scalability: Layered structure and statelessness enable scaling services to manage increased loads.
•Flexibility: Multiple types of calls can be processed by REST APIs and returned as different data formats, e.g., JSON or XML.
•Performance: Server loading is decreased through caching features and response times are enhanced.
•Simplicity: Using common HTTP methods and a consistent interface makes development and integration easier.
•Interoperability: REST APIs are consumable by different clients, such as web browsers, mobile applications, and other servers. These advantages make REST API an effective tool for developing stable web services
Common Challenges and Solutions

Though REST API has numerous benefits, developers can face issues:
•Security Risks: Opening APIs to the internet exposes them to vulnerabilities. Adopting authentication methods such as OAuth and employing HTTPS can prevent threats.
•Versioning: To ensure that APIs develop over time, backward compatibility must be maintained. Version numbers in URIs (e.g., /v1/users) assist with changes.
•Error Handling: Returning useful error messages and relevant HTTP status codes improves the client experience.
•Rate Limiting: As a measure to avoid abuse, apply rate limiting to limit the number of requests a client is allowed to send.
Solving these issues helps keep the REST API secure, stable, and easy to use.
Best Practices for REST API Development

Observing best practices improves the quality and maintainability of REST APIs:
•Use JSON for Data Exchange: JSON is light and commonly supported, hence a good data exchange format.
•Use Correct Status Codes: Utilize standard HTTP status codes to represent the outcome of operations (e.g., 200 OK, 404 Not Found).
•Document Thoroughly: Proper documentation enables users to effectively interact with the API.
•Support Filtering and Pagination: On endpoints that return large data sets, add filtering and pagination for increased performance.
•Log and Monitor API Usage: Monitoring usage patterns assists in the determination of issues and scaling plans.
By adopting these practices, developers are able to develop REST APIs that are efficient, reliable, and well-maintainable.
FAQs
1.Is REST API utilized for websites alone?
No. Although prevalent in web applications, REST API is also applied in mobile applications, desktop applications, and even in IoT devices. Wherever systems have to share data, REST API can be applied.
2.Do I need to know coding to use a REST API?
Basic understanding of HTTP and utilities such as Postman can make it possible for you to deal with a REST API without any coding. Developing or heavily embedding REST APIs generally needs programming capabilities.
3.How does REST API differ from SOAP API?
REST API employs standard web protocols and tends to be light in weight, whereas SOAP is more structured and is based on XML. REST tends to be easier to implement and scalable.
4.Can I test a REST API without having a server?
Yes. You can mock REST API responses with tools such as Postman or Mockoon. The tools mimic the way the API would act so that you can test without implementing a complete backend.

Conclusion
REST API is a powerful tool that connects the frontend and backend, enabling smooth communication in modern web apps. By mastering how it works with tools like React, Axios, and Express.js, you’ll be equipped to build fast, dynamic, and scalable applications with confidence.


1 thought on “15 Powerful Reasons to Master REST API Today”